The blogdown package automates this process and open the resulting page in RStudio viewer. You just provide .Rmd files and any time you make a change, blogdown crunches all the R chunks, generates .md files and uses pandoc to translate them into HTML pages.
I am going to use it mainly for code snippets that are too short for this blog but too long for a tweet. Plus I do not wish to forget them. See my blogdown blog on the first figure. Here, I will provide a step-by-step guide how to create a similar one.
 |
| My blogdown blog at http://simecek.github.io/blog |
1) Create a Github repository:
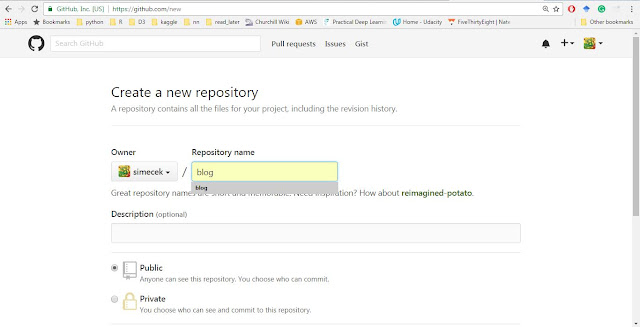
Go to your Github account, click the big green button "New Repository" and name your blog (it will later appear at http://USERNAME.github.io/BLOGNAME where BLOGNAME is a name of your repository).Do not create the "README" or "LICENCE" file. If you did, just delete it because blogdown requires to start with an empty directory and throws a message "Warning message: In blogdown::new_site() : The directory '.' is not empty" otherwise.
 |
| New repository |
2) Create RStudio Project:
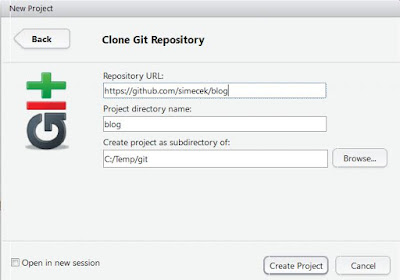
Open RStudio, select File -> New Project -> Version Control -> Git. Copy URL address from your browser (http://github.com/USERNAME/BLOGNAME) into Repository URL field. Click "Create Project" button. |
| New RStudio project |
3) Install blogdown and create an empty skeleton
You can install blogdown from Github with devtools:devtools::install_github('rstudio/blogdown')
After that you might need to install HUGO, a platform that blogdown stands on, with blogdown::install_hugo(). Finally, a skeleton of a new blog can be generated by blogdown::new_site().
4) Customize config.toml file
Open the file "config.toml" and add a new line with publishDir = "docs" (preferably somewhere at the beginning of the file). This makes your HTML page to be generated into "./docs" folder and setting of your Github Pages will be later much easier. If you prefer hard ways, Amber Thomas and Jente Hidskes describe how to keep default "publishDir" and push the "./public" folder into a branch with git subtree.You might also want to add the links to your Twitter, Github... accounts, maybe even Google Analytics and Disqus.
Finally, call blogdown::serve_site() and view the blog. Any change you do immediately propagates into your RStudio viewer.
If you do not like the default look, you can choose and customize a theme from Hugo Theme gallery (use blogdown::install_theme function).
5) Commit Changes, Push Them to Github and Github Page Setting
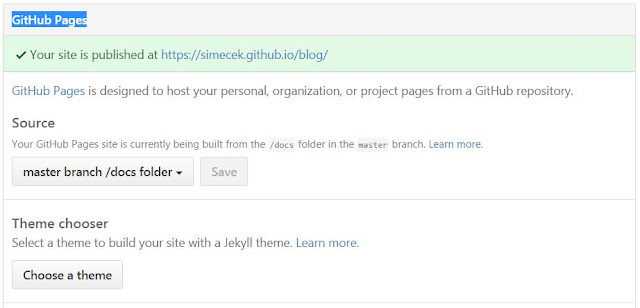
Finally, go into your RStudio "Git" panel, select all files and commit them with and an appropriate message ("initial commit of my first blogdown blog, hurray!"). Of course, if you prefer git in a terminal to RStudio "Git" panel, you can commit and push to Github from a command line (git push -u origin master).Next, you need to tell Github where to look for your Github pages. In the repo "Settings" (http://github.com/USERNAME/BLOGNAME/settings), find "GitHub Pages -> Source", select "master branch /docs folder" and push the "Save" button.
 |
| Setting Github Pages |
6) Adding a content
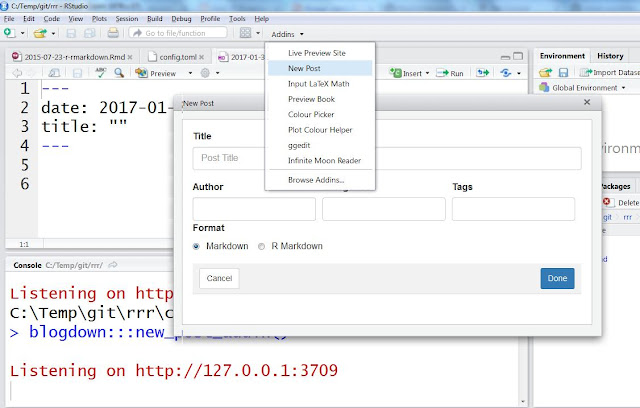
Finally, your blog is online. You can access it at http://USERNAME.github.io/BLOGNAME.To add content use either new_post() function or RStudio add-in "New post" as shown on a figure below. Use format "R Markdown" if your post contains R code that needs to be run and "Markdown" otherwise. If you are new to markdown, Help -> Markdown quick reference (from RStudio menu) contains a lot of useful tips.
 |
| New post addin |
UPDATE 2/1/2016: Regarding Disqus problem: it is caused by blogdown::serve_site() function that ignores some settings in config.toml file, namely baseurl option. If you want to use Disqus, set URL of your blog to baseurl and run blogdown::build_site(local=FALSE) just before committing and pushing changes to Github. See build_site() help for more information.


