Friday, May 12, 2017

Buy Your Mother a Domain for a Mother's Day (GoDaddy Domain for GitHub Pages)

Mother's Day is coming. Flowers and chocolate are nice and all. But if you want to surprise your mother with something less traditional, you can register her a domain and add Github Page as a gift.

I have registered simecek.xyz domain a long time ago. Yesterday I discovered it is really easy to connect it to Github Page or blog.

  1. GitHub:

    In a repository with your Github Pages, create a file CNAME and write your domain address in it (e.g. "simecek.xyz")

  2. GoDaddy:

    Find DNS setting for your domain. GoDaddy is changing web interface all the time but it should look something like this

    DNS Settings for your domain
    You need to change two values: "A" should be 192.30.252.153 and CNAME www should be your Github Page's URL (e.g. GITHUB_USER_NAME.github.io).
And that is all. Wait a few minutes until the change propagates through the internet and test it.


Wednesday, April 26, 2017

Making your plots interactive - update

Two years ago I have been experimenting with Shiny and interactive plots and I have published here a post that remains to be one of the most read pages of this blog. I feel guilty about it because I was wrong about almost everything. A few weeks later, the free use of shinyapps.io was over. Meanwhile, plotly package, I did not appreciate that time so much, has matured and added more R functionality.

If you are into ggplot2, it is now super-easy to add interactivity to your graph. Just take your static ggplot object pl like the following

mpg dataset
and run

library(plotly)
ggplotly(pl)

That's it. You can configure your tooltip text with ggplotly(pl, tooltip = "text"), see my Rmarkdown example. And it works not only for a simple scatterplot but for more complex graphs as well, as @cpsievert tweeted today.


There are now also many easy-to-use htmlwidgets. And with the ggiraph package, you get now your click as Shiny input.

Tuesday, January 31, 2017

Blogging from RStudio with blogdown package

In my previous post, I described how to make a simple personal Github page with Jekyll. You can blog in R/Markwown this way, you just need to ask rmarkdown to keep .md files and push them (with images and other assets) to Github.

The blogdown package automates this process and open the resulting page in RStudio viewer. You just provide .Rmd files and any time you make a change, blogdown crunches all the R chunks, generates .md files and uses pandoc to translate them into HTML pages.

I am going to use it mainly for code snippets that are too short for this blog but too long for a tweet. Plus I do not wish to forget them. See my blogdown blog on the first figure. Here, I will provide a step-by-step guide how to create a similar one.


My blogdown blog at http://simecek.github.io/blog


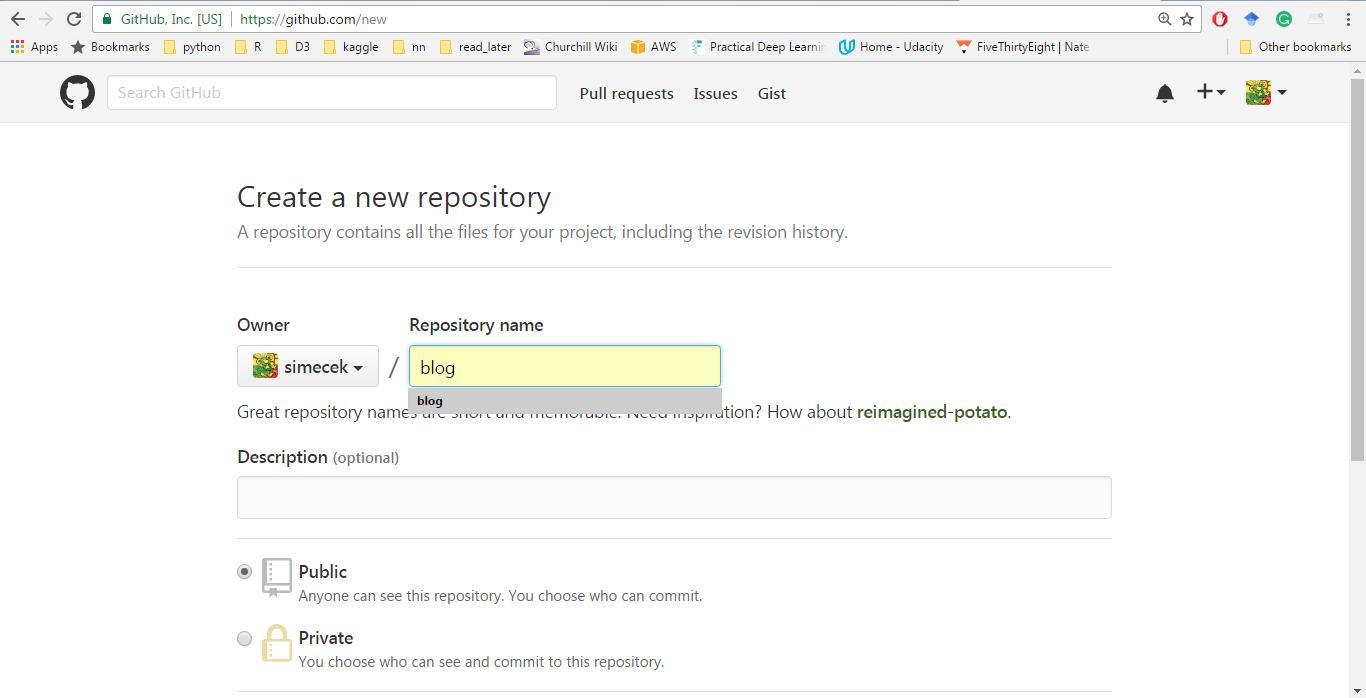
1) Create a Github repository:

Go to your Github account, click the big green button "New Repository" and name your blog (it will later appear at http://USERNAME.github.io/BLOGNAME where BLOGNAME is a name of your repository).

Do not create the "README" or "LICENCE" file. If you did, just delete it because blogdown requires to start with an empty directory and throws a message "Warning message: In blogdown::new_site() : The directory '.' is not empty" otherwise.

New repository

2) Create RStudio Project:

Open RStudio, select File -> New Project -> Version Control -> Git. Copy URL address from your browser (http://github.com/USERNAME/BLOGNAME) into Repository URL field. Click "Create Project" button.
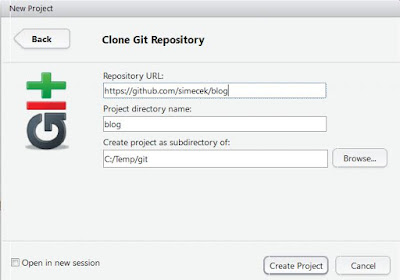
New RStudio project

3) Install blogdown and create an empty skeleton

You can install blogdown from Github with devtools:

devtools::install_github('rstudio/blogdown')

After that you might need to install HUGO, a platform that blogdown stands on, with blogdown::install_hugo(). Finally, a skeleton of a new blog can be generated by blogdown::new_site().

4) Customize config.toml file

Open the file "config.toml" and add a new line with publishDir = "docs" (preferably somewhere at the beginning of the file). This makes your HTML page to be generated into "./docs" folder and setting of your Github Pages will be later much easier. If you prefer hard ways, Amber Thomas and Jente Hidskes describe how to keep default "publishDir" and push the "./public" folder into a branch with git subtree.

You might also want to add the links to your Twitter, Github... accounts, maybe even Google Analytics and Disqus. For Disqus, I did not manage to use a default template and was forced to create my own version of footer. Solved - see Update.

Finally, call blogdown::serve_site() and view the blog. Any change you do immediately propagates into your RStudio viewer.

If you do not like the default look, you can choose and customize a theme from Hugo Theme gallery (use blogdown::install_theme function).

5) Commit Changes, Push Them to Github and Github Page Setting

Finally, go into your RStudio "Git" panel, select all files and commit them with and an appropriate message ("initial commit of my first blogdown blog, hurray!"). Of course, if you prefer git in a terminal to RStudio "Git" panel, you can commit and push to Github from a command line (git push -u origin master).

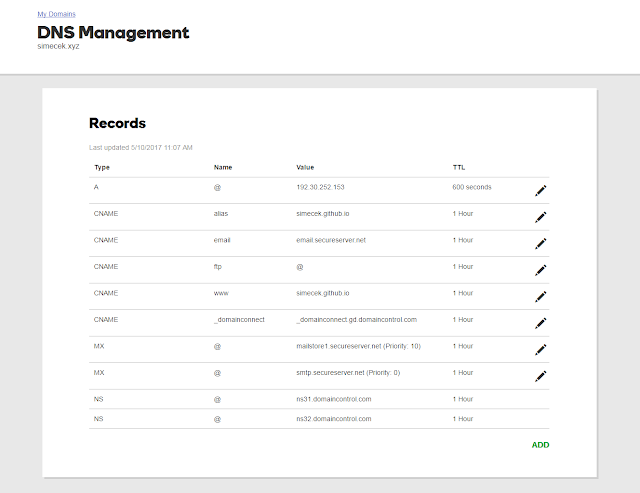
Next, you need to tell Github where to look for your Github pages. In the repo "Settings" (http://github.com/USERNAME/BLOGNAME/settings), find "GitHub Pages -> Source", select "master branch /docs folder" and push the "Save" button.

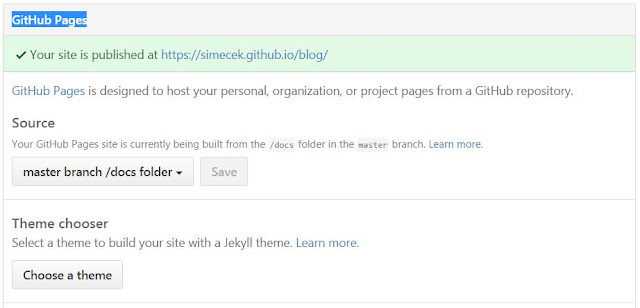
Setting Github Pages

6) Adding a content

Finally, your blog is online. You can access it at http://USERNAME.github.io/BLOGNAME.

To add content use either new_post() function or RStudio add-in "New post" as shown on a figure below. Use format "R Markdown" if your post contains R code that needs to be run and "Markdown" otherwise. If you are new to markdown, Help -> Markdown quick reference (from RStudio menu) contains a lot of useful tips.
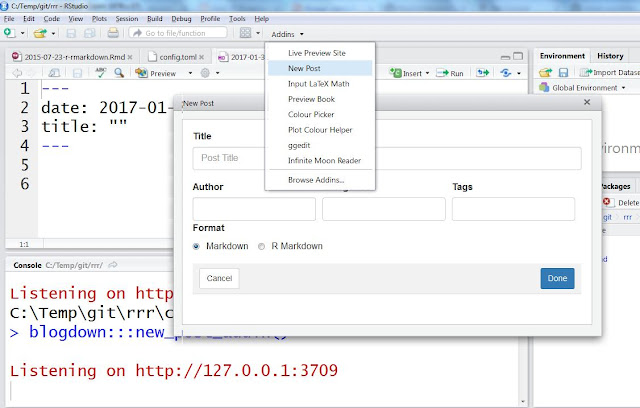
New post addin

UPDATE 2/1/2016: Regarding Disqus problem: it is caused by blogdown::serve_site() function that ignores some settings in config.toml file, namely baseurl option. If you want to use Disqus, set URL of your blog to baseurl and run blogdown::build_site(local=FALSE) just before committing and pushing changes to Github. See build_site() help for more information.

Thursday, January 26, 2017

Simple Personal Github Page (with Jekyll)

I remember when I was creating my first Github Page. I was still quite new to git, did not understand branches and I was lost in Jekyll configuration. This step-by-step guide is intended for people in such situation that are, however, users of a) Github b) RStudio (if not, read this).

1. Create Github Repository

Go to your Github account and click the big green button "New Repository", name your new repository USERNAME.github.io (for example simecek.github.io).

New Github repo

2. Create RStudio Project

Open RStudio, select File -> New Project -> Version Control -> Git. Copy URL address from your browser (http://github.com/USERNAME/USERNAME.github.io) into Repository URL field (see figure below). Click "Create Project" button.

New version controlled project

Locate the folder (USERNAME.github.io) on a disk. You will need it in the following step.

3. Select and Customize Jekyll Template

If you wish, you can use any static web page as your Github Page. For example, you can just have a redirecting script. Here, I will show how to build a simple landing page with Jekyll.

First of all, select a template you want to use, for example from http://jekyllthemes.org/

Jekyll Themes gallery


Save and extract template ZIP file into your RStudio project folder USERNAME.github.io, so it should now look something like this (the folder on a disk, NOT yet Github repository).

Read extracted README file. Typically, you need to customize _config.yml and index.html files. The page itself is generated by Jekyll (ruby gem). Github supports Jekyll, so you might let generation of the actual HTML pages on him.

4. Commit Changes and Push Them to Github

Finally, go into your RStudio "Git" panel, select all files and commit them with and an appropriate message ("initial commit of my first Github Page, hurray!").

Git panel is just next to Environment and History


You might want to check that Github Pages are turned on in your repo's setting (https://github.com/USERNAME/USERNAME.github.io/settings). You might need to wait for a minute or two before the page is generated. Do not like it? Modify - commit - push (- make a tea - rinse - and repeat).